USMT Offline Migration in Windows PE with Hardlinks
Let’s get on with it. What are we talking about here? User backup of all
important files, bookmarks, user profiles and their desktops using Microsoft
User State Migration Toolkit v4. We want to do this not from within Windows but
during the Windows PE state before we apply a new OS.
The good thing about doing this in Windows PE and with Hardlinks is pronounced Speed. Hardlinks make file copying locally and over the network unnecessary. It needs no extra disk space and there won’t be any locked files as when you’re doing migrations from within Windows. It’s not magic but it’s pretty close.
Also if you have a computer that doesn’t boot into Windows but has lots of important files on it and with a readable disk – this is the only way to copy that data.
The only thing you can’t do with USMT and Hardlinks in Windows PE is if you’re replacing the hardware. USMT with hardlinks in Windows PE mode is for re-installing the computer with a new OS (or OS version) only. For other scenarios you need a server-state store. That method is not covered in this post.
Let’s jump straight to business. Here’s what my Task-sequence looks like, stripped off stuff that’s not important for what we’re trying to illustrate here.
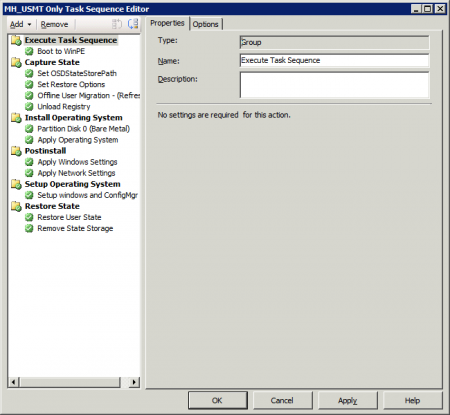
First a short overview of what it does. All the meaty details are further below. You can download the entire Task Sequence here. (Rename it to *.xml and import into SCCM.)

This is not rocket science. It checks if the TaskSequence Variable _SMSTSInWinPE equals False. So if you’re in Windows, reboot to PE. You’ve seen this before, download the entire Task Sequence above if you haven’t.
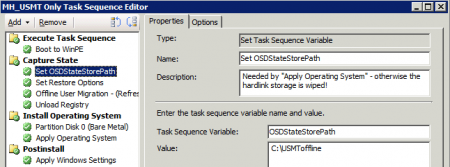
Here we define the OSDStateStorePath variable. This is where the Hardlink data will be saved. If you don’t define it, Apply Operating System will wipe your disk including your Hardlinks folder. Also, this variable is needed by my Scanstate-script and the restore job later on.
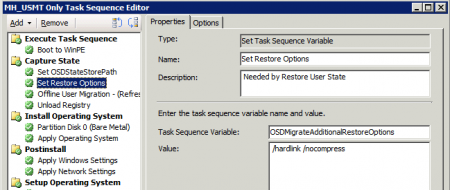
This variable ‘OSDMigrateAdditionalRestoreOptions” is needed by the USMT command Loadstate (Task Sequence Name: Restore User State), so that it understands that it should look for Hardlinks when restoring data. Without this it’ll fail doing that.
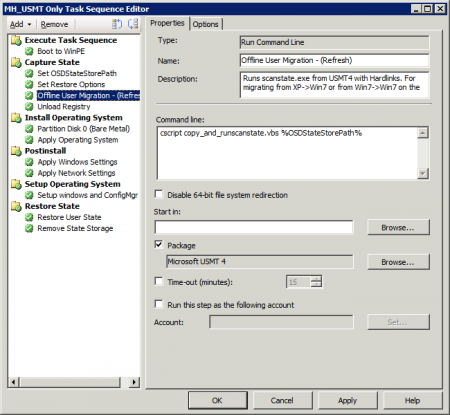
Then comes the step where the scanstate command is run and all the hardlinking is done. I’ve put all this into a single VB-script which is placed together with the USMT4 package. The script copies the USMT folder to the harddrive and runs the command from there. In my script only the 64-bit folder is copied to save some time. If you’re running 32-bit Windows you need to change the folder names to x86 instead of amd64. The script needs one input parameter which is the path to the Offline State store. (Done above.)
This is what the entire script looks like:
Note that the last line in the script we also set the Working Directory for USMT. This is necessary for USMT to work properly. The working folder is removed automatically by “Apply Operating System” which wipes everything that’s not in the OSDStateStorePath defined eariler.
This script is stored in the root of the USMT4-package folder together with the Remove_Statestore-script.

Remember to refresh your package after copying the scripts there.
And now for the bug that comes with USMT4 and 64 bit Win7. I know others have found it before me but here’s another solution to it I think.
What I got was something like this in the scanstate.log :
Software is actually the file-version of this part of the registry that is still in use and can’t be unloaded by USMT. And that is bad since it it’ll crash the Apply Operating System part with error number 0×80070091 later if the file is still in use.
Enter the hotfix. Simply run:
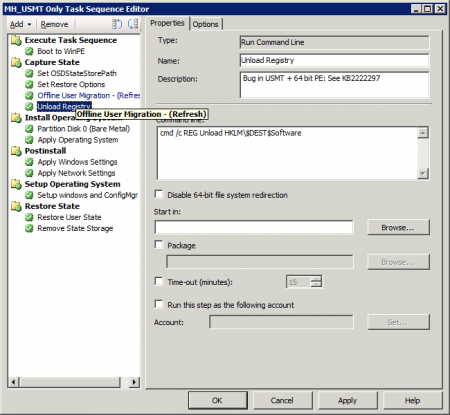
The next step isn’t necessary for USMT offline migration but I just want to show if you want to use this Task Sequence for brand new bare metal machines as well – you might pop this in:

Simply check if c:\Windows is there. If it isn’t, format the disk.
The next step is to Apply the OS. To avoid confusion with RAM-disks (X:) – I choose to apply the OS to C:.
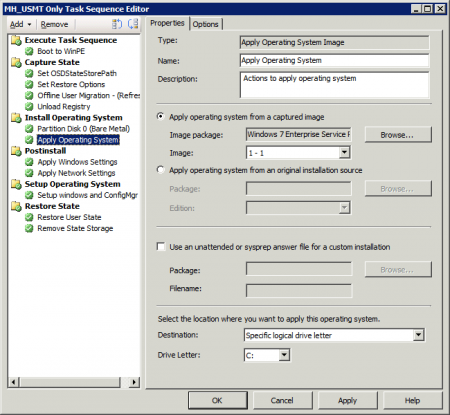
I’ll skip the description of Apply Windows and Networks settings here since I haven’t done anything special with them.
Check the Task Sequence I linked to above if you want to see the details.
Restore User state. Here we use the built in Restore User State option that’s part of SCCM 2007. You need to choose the USMT package here (which easily can be created with a Microsoft Deployment Toolkit task-sequence wizard). This step actually restores all data that is defined by miguser.xml and migapp.xml which are originally a part of the USMT-package.

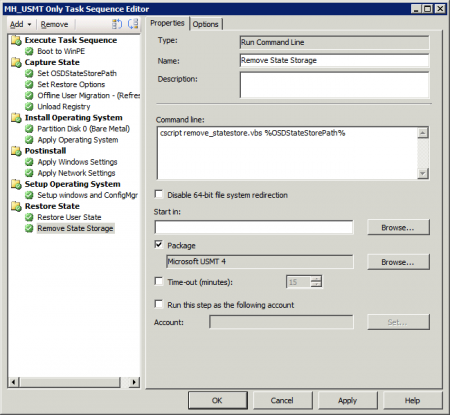
We would be done by now if it wasn’t for that the Hardlink folder (OSDStateStorePath) is still left on the drive. There’s a blog on technet that suggests you should run USMTUtils.exe as a command-line task with “Download content locally” set on the package. That’ll make SCCM download all the contents for the package just to run USMTUtils.exe and that’ll take a lot of extra time. I run a script instead which I have put in the root of my USMT4 package. (See screenshot above.)
This script, just like the other one, needs one input parameter which is the path to the Offline State store. (Which we’ve done in the Set OSDStateStorePath -step.) Then it’ll simply copy the USMTUtils-file needed and execute it.
This is what the entire script looks like:
Download
the script here. Rename it to *.vbs afterwards.
That’s it! You’re done! Thanks again to Niall for writing the original guide.
The good thing about doing this in Windows PE and with Hardlinks is pronounced Speed. Hardlinks make file copying locally and over the network unnecessary. It needs no extra disk space and there won’t be any locked files as when you’re doing migrations from within Windows. It’s not magic but it’s pretty close.
Also if you have a computer that doesn’t boot into Windows but has lots of important files on it and with a readable disk – this is the only way to copy that data.
The only thing you can’t do with USMT and Hardlinks in Windows PE is if you’re replacing the hardware. USMT with hardlinks in Windows PE mode is for re-installing the computer with a new OS (or OS version) only. For other scenarios you need a server-state store. That method is not covered in this post.
Let’s jump straight to business. Here’s what my Task-sequence looks like, stripped off stuff that’s not important for what we’re trying to illustrate here.

First a short overview of what it does. All the meaty details are further below. You can download the entire Task Sequence here. (Rename it to *.xml and import into SCCM.)
- First, boot to WinPE just in case we’re not immediately booting into it through PXE.
- Then we set the OSD State Store path, that’s where we’ll save the Hardlink-information.
- We set the Restore Options needed later – which is with Hardlinks and Uncompressed.
- Then we do the actual backup with the USMT-command Scanstate, through a VBScript.
- In 64bit Windows 7 there’s a bug where USMT4 doesn’t correctly unload the registry which’ll leave registry-files left on the harddisk. Which’ll make Scanstate fail. We’ll fix this without a reboot.
- The next step (Partition) is only if this is a new computer that doesn’t need to be backed up. For USMT with Hardlinks, you mustn’t format your harddrive. This is just here to make this Task Sequence work for new computers too.
- Apply Operating System Wipes the harddisk for you but saves your OSD State Store path. Which is why we need to set the OSDStateStorePath – without it your hardlinks are gone.
- Skip to Restore User State which is the built in Task-Sequence that we’re using with USMT4. Quite normal.
- The last step is to remove the OSD State Store with a VBScript since in 64-bit Windows (again) this isn’t done properly by USMT. Microsoft solution to this is, well, sub optimal. This way is better. I’ll show you why.

This is not rocket science. It checks if the TaskSequence Variable _SMSTSInWinPE equals False. So if you’re in Windows, reboot to PE. You’ve seen this before, download the entire Task Sequence above if you haven’t.

Here we define the OSDStateStorePath variable. This is where the Hardlink data will be saved. If you don’t define it, Apply Operating System will wipe your disk including your Hardlinks folder. Also, this variable is needed by my Scanstate-script and the restore job later on.

This variable ‘OSDMigrateAdditionalRestoreOptions” is needed by the USMT command Loadstate (Task Sequence Name: Restore User State), so that it understands that it should look for Hardlinks when restoring data. Without this it’ll fail doing that.
Then comes the step where the scanstate command is run and all the hardlinking is done. I’ve put all this into a single VB-script which is placed together with the USMT4 package. The script copies the USMT folder to the harddrive and runs the command from there. In my script only the 64-bit folder is copied to save some time. If you’re running 32-bit Windows you need to change the folder names to x86 instead of amd64. The script needs one input parameter which is the path to the Offline State store. (Done above.)

This is what the entire script looks like:
Option Explicit
Download
it here. Rename it to *.vbs afterwards.
Dim fso, wshell, sPath,
sOSDStateStorePathArg
Set fso = CreateObject("Scripting.FileSystemObject")
Set wshell = CreateObject("WScript.Shell")
sOSDStateStorePathArg = WScript.Arguments.Item(0)
If fso.FolderExists
(sOSDStateStorePathArg) = False Then fso.CreateFolder (sOSDStateStorePathArg) 'Store our migration data during scanstate
operations
If fso.FolderExists
("C:\USMT")
= False Then fso.CreateFolder ("C:\USMT") 'Stores
scanstate native files.
If fso.FolderExists
("C:\Temp")
= False Then fso.CreateFolder ("C:\Temp") 'Stores
scanstate native files.
sPath = wshell.CurrentDirectory
wshell.Run ("cmd /c xcopy " & sPath & "\amd64 C:\USMT /hericy"),0,True ' Copies all
relevant binaries and stuff to C:\usmt\amd64
wshell.Run ("cmd /c SET "&chr(34)&"USMT_WORKING_DIR=C:\Temp"&chr(34)&" & C:\USMT\scanstate.exe
" & sOSDStateStorePathArg & " /c /o
/hardlink /efs:hardlink /nocompress /offlinewindir:c:\windows /v:5
/l:c:\windows\temp\SMSTSLog\scanstate.log /i:c:\USMT\miguser.xml
/i:c:\USMT\migapp.xml"),0,True
WScript.Quit (0)
Note that the last line in the script we also set the Working Directory for USMT. This is necessary for USMT to work properly. The working folder is removed automatically by “Apply Operating System” which wipes everything that’s not in the OSDStateStorePath defined eariler.
This script is stored in the root of the USMT4-package folder together with the Remove_Statestore-script.

Remember to refresh your package after copying the scripts there.
And now for the bug that comes with USMT4 and 64 bit Win7. I know others have found it before me but here’s another solution to it I think.
What I got was something like this in the scanstate.log :
2009-06-20 13:08:39, Warning [0x0803de] Failed to unload hive at HKEY_LOCAL_MACHINE\$DEST$SOFTWARE (error 1314)So what happens here is that there’s a file left on the harddisk, namely : C:\WINDOWS\system32\config\software
Software is actually the file-version of this part of the registry that is still in use and can’t be unloaded by USMT. And that is bad since it it’ll crash the Apply Operating System part with error number 0×80070091 later if the file is still in use.
Enter the hotfix. Simply run:
cmd /c REG Unload HKLM\$DEST$SoftwareStraight after USMT is done. And voilà, the Hive is unloaded! I found this info in KB2222297 which is not so well known I think. Some other article suggested a reboot instead. Now that’s not improving my OSD-speed! Note again, you don’t need this step (Unload Registry) for 32-bit Windows 7.

The next step isn’t necessary for USMT offline migration but I just want to show if you want to use this Task Sequence for brand new bare metal machines as well – you might pop this in:

Simply check if c:\Windows is there. If it isn’t, format the disk.
The next step is to Apply the OS. To avoid confusion with RAM-disks (X:) – I choose to apply the OS to C:.

I’ll skip the description of Apply Windows and Networks settings here since I haven’t done anything special with them.
Check the Task Sequence I linked to above if you want to see the details.
Restore User state. Here we use the built in Restore User State option that’s part of SCCM 2007. You need to choose the USMT package here (which easily can be created with a Microsoft Deployment Toolkit task-sequence wizard). This step actually restores all data that is defined by miguser.xml and migapp.xml which are originally a part of the USMT-package.
We would be done by now if it wasn’t for that the Hardlink folder (OSDStateStorePath) is still left on the drive. There’s a blog on technet that suggests you should run USMTUtils.exe as a command-line task with “Download content locally” set on the package. That’ll make SCCM download all the contents for the package just to run USMTUtils.exe and that’ll take a lot of extra time. I run a script instead which I have put in the root of my USMT4 package. (See screenshot above.)
This script, just like the other one, needs one input parameter which is the path to the Offline State store. (Which we’ve done in the Set OSDStateStorePath -step.) Then it’ll simply copy the USMTUtils-file needed and execute it.

This is what the entire script looks like:
Option Explicit
Dim fso, wshell, sPath,
sOSDStateStorePathArg
Set fso = CreateObject("Scripting.FileSystemObject")
Set wshell = CreateObject("WScript.Shell")
sOSDStateStorePathArg = WScript.Arguments.Item(0)
If fso.FolderExists
("C:\USMT")
= False Then fso.CreateFolder ("C:\USMT") 'For the
util.
sPath = wshell.CurrentDirectory
wshell.Run ("cmd /c copy " & sPath & "\amd64\usmtutils.exe C:\USMT"),0,True ' Copies Util to
C:\USMT
wshell.Run ("cmd /c echo Y | c:\USMT\usmtutils.exe /rd " &
sOSDStateStorePathArg ),0,True
fso.DeleteFolder "C:\USMT",True
WScript.Quit (0)
That’s it! You’re done! Thanks again to Niall for writing the original guide.

Comments
Post a Comment